Planning A to B
Pick where you’re starting, pick where you’re going, look at what the app came back with, then set off. The planner always shows you the route before it takes you anywhere.
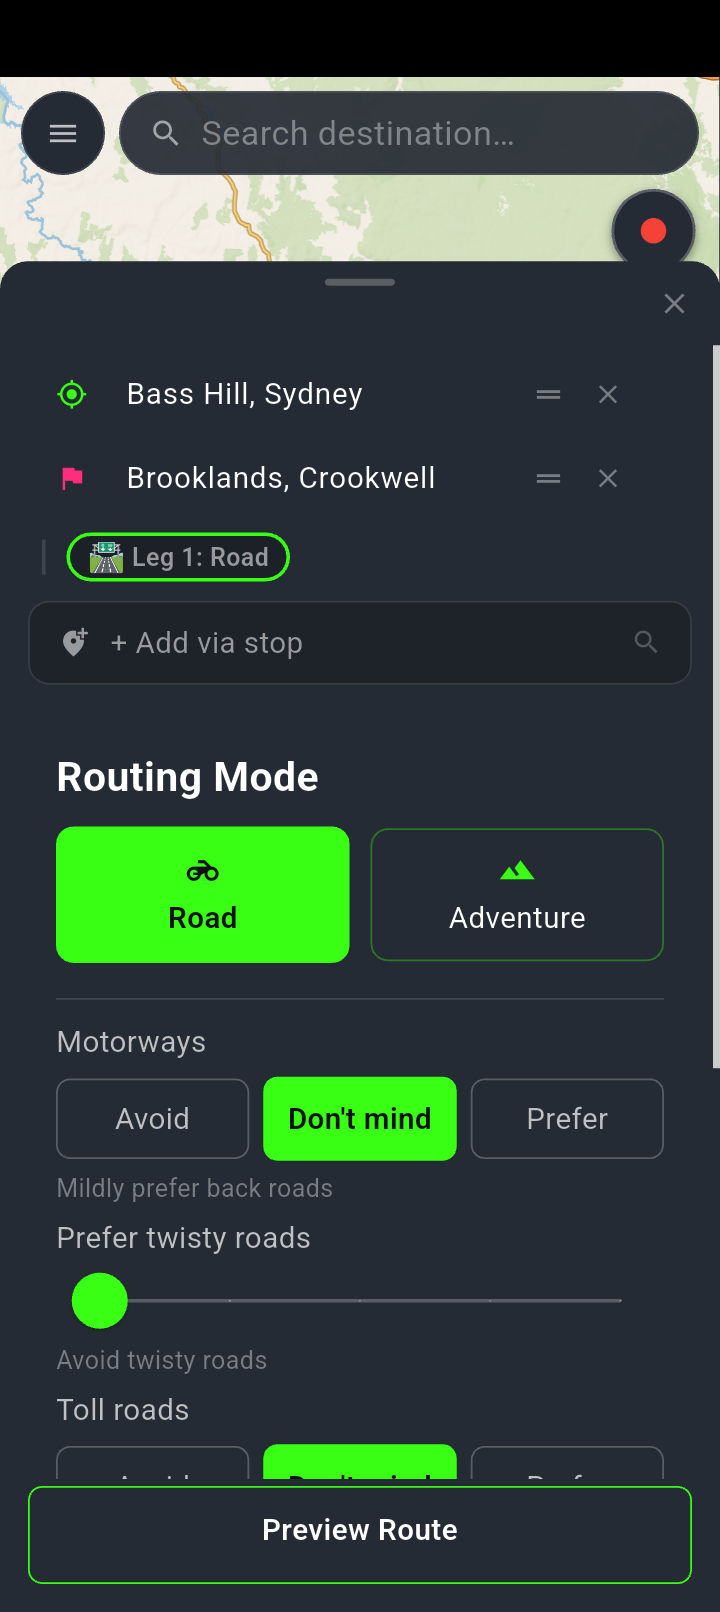
Your two ends at the top, the route controls underneath, and the two buttons pinned to the bottom.
Preview Route wakes up as soon as you have both ends. Start Navigation stays asleep until a route has actually been worked out.
Opening the planner
There isn’t one button marked “plan a route” — the sheet opens itself the moment you tell the app about a place. Any of these will do it:
- Search for somewhere and choose Set as Destination or Set as Start.
- Press and hold anywhere on the map and pick the same options from the panel that appears.
- Open My Markers and send one of your saved spots to the planner.
If the sheet opens with nothing in it, you’ll see two rows — Set start location… and Search for destination… — and tapping either opens the same search you use from the map.
Setting the two ends
-
Set your destination
Search for it, or press and hold the spot on the map and choose Set as Destination.
-
Let the app fill in your start
If the planner is empty and your GPS has a fix, setting a destination quietly uses your current position as the start. You’ll see it appear as the first row.
-
Or set the start yourself
Use Set as Start to plan a ride that begins somewhere else — the pub you’re meeting at on Sunday, for instance. Setting a start replaces whatever was in that row before.
-
Tap Preview Route
It stays dim until both ends are set. With only a destination in the list, a line underneath reads Set a start location to preview.
While it works, the button reads Calculating… and a line appears underneath: First route loads map data — takes ~1 min. That’s the app loading the routing data off your phone’s storage. Later routes are quick.
Reading the result
Once a route exists, the sheet swaps to a compact card so you can see the map behind it. The card shows the distance and the riding time, and gives you:
- Start Navigation — begin turn-by-turn.
- Edit route — go back to the full planning view with your stops and settings intact.
- Add stop on map — drop another stop by tapping the map.
- Turn-by-turn — a row giving the number of turns on the route. Tap it to read the whole list before you ride.
- Export GPX and Save to Calendar.
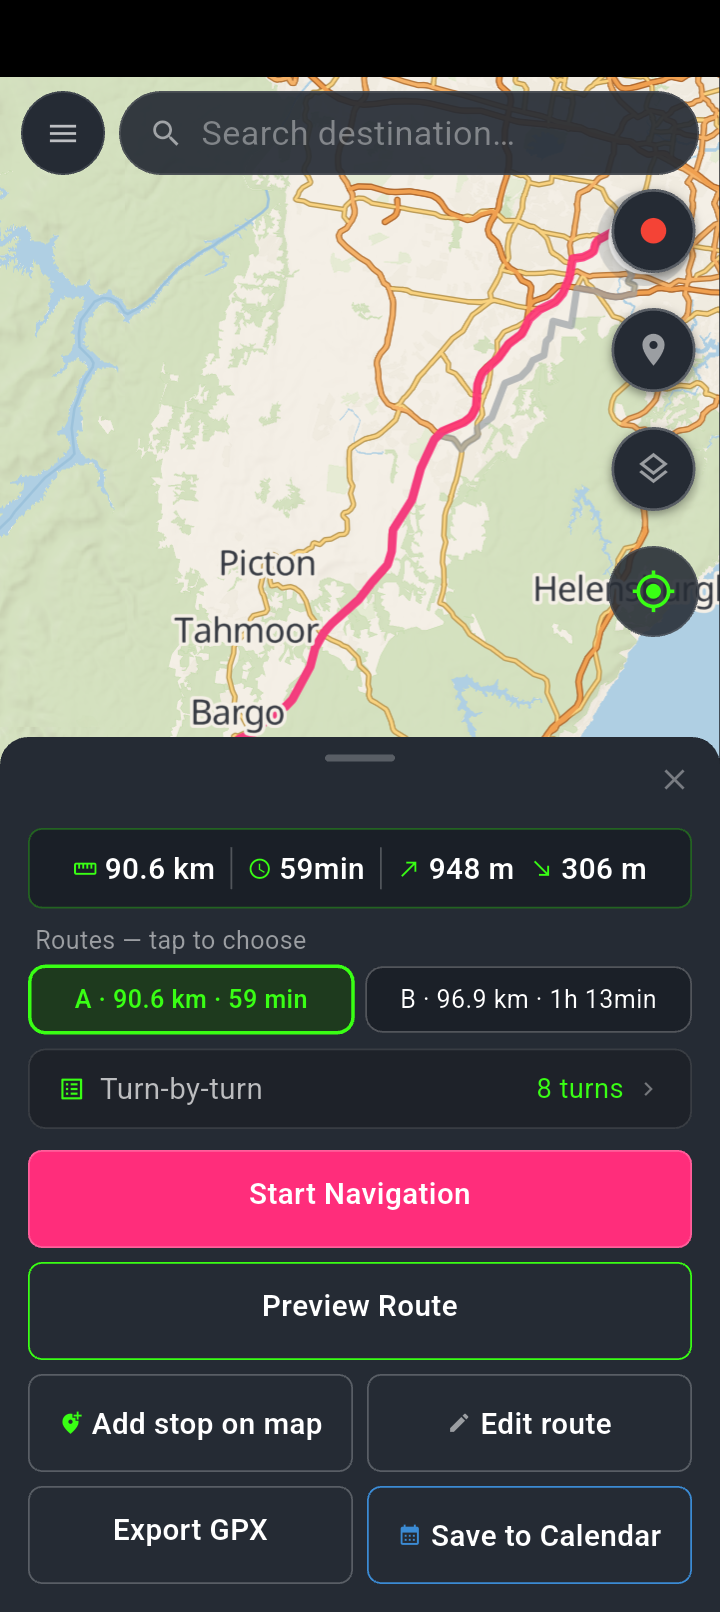
The card after a preview. The numbers sit at the top, the alternatives underneath, and the buttons below them.
The two cards here are the same ride planned two ways — one 6 km shorter, one thirteen minutes longer. Tap either and the map redraws.
You won’t find Export GPX or Save to Calendar in the main planning view. They appear on the result card, because there’s nothing to export or save until a route has been worked out. A padlock on either one means it isn’t available on your plan.
When the destination isn’t on a road
If your destination sits well back from the nearest sealed road, the card splits the numbers in two: an approximate figure for the sealed run, labelled sealed road to with the road’s name, and a second one labelled fire trail to destination in amber. The total is shown underneath. Both are marked with a ~ because they’re worked out as two separate routes rather than measured off one.
When there’s more than one way
NavForge asks the router for alternatives, and when it gets back more than one it shows them as a short row of cards under the numbers — up to three, each reading something like A · 25.1 km · 28 min · 3% main. The one currently drawn on the map is outlined in green.
Tap a different card and it becomes the route: the pink line redraws, the numbers update, and Start Navigation, Export GPX and Save to Calendar all take the one you picked. Nothing else changes — your stops and your settings are untouched.
The cards only appear when the router actually found two or more genuinely different ways. On a short run, or where there is only one sensible road, you get one card or none. The % main figure appears only when the app has had reason to measure it — that is, when Main roads is set to Avoid.
The presets and every route control shape the request that produced these. Picking a different card does not reopen or override any of them.
What “Avoid main roads” cost you
When Main roads is set to Avoid, the card prices the quiet route against the ordinary one, in green, above the route options — something like +19.4 km, +83 min — avoiding main roads. You see what the back roads are costing before you commit to them.
Two honest variants, because it doesn’t always get you what you asked for:
- If the quietest route it found is still largely main roads, it says so with the number rather than claiming otherwise — +8.2 km, +14 min — quietest option, 61% main roads.
- If avoiding them cost nothing measurable, it reads Avoiding main roads with no figures attached.
The line that says what a control did
Change a route control and the card tells you what happened, in one line. If the route moved, it reads along the lines of Motorways → less: 16 km of this 22 km route is new. If it didn’t move, it says so plainly: Motorways → less: same route.
That second case is the useful one. A control that changed nothing used to look exactly like a control that was switched off, and you were left guessing whether you had been ignored. Now the app tells you the roads here offered no alternative — which is a different thing from the setting not working.
Starting the ride
Tap Start Navigation and the sheet closes, the map moves to you, and guidance begins.
You can also drag the sheet down instead of starting straight away. The route stays drawn on the map and a bar appears near the bottom reading Route ready — tap to edit, with a green Go at the end and an × to throw it away. That’s there so you can pinch around the route first and start when you’re ready.
Already there. If you’re within about 50 metres of the destination, tapping Start Navigation shows You’re already at the destination. and does nothing else. Navigation that ends the moment it starts is worse than none.
Destination adjusted. Starting from the Go bar when the nearest road access is more than 200 metres from the point you picked brings up a Destination adjusted dialog telling you the distance, and warning that the last stretch may be off-road or on foot. Continue rides it anyway; Cancel backs out.
When a route can’t be found
Three messages cover most of it, and each one points at a different problem:
- Waypoint is not near a road — move it to a road and try again. One of your stops landed in a paddock, a lake, or a national park with no mapped access.
- No route found between these stops. Try a different location. There’s genuinely no road connection the router can use — often an island, or a stop just outside the map region you’ve downloaded.
- Route unavailable. Check your stops and try again. The catch-all. Worth one more go before you start moving stops.
Clearing up
The × in the top-right of the sheet cancels everything — the route, the line on the map, the lot — and the map snaps back to where you are. Dragging the sheet down does not: that leaves the route alive under the Go bar, which is usually what you want.