Planning on the website
You don’t need the phone to plan a ride. The planner at plan.navforge.app — also under Plan a ride in the site menu — draws the same maps the app downloads, asks the same routing engine, and hands you a GPX or a link at the end. It works in any browser, on a desktop or a phone.
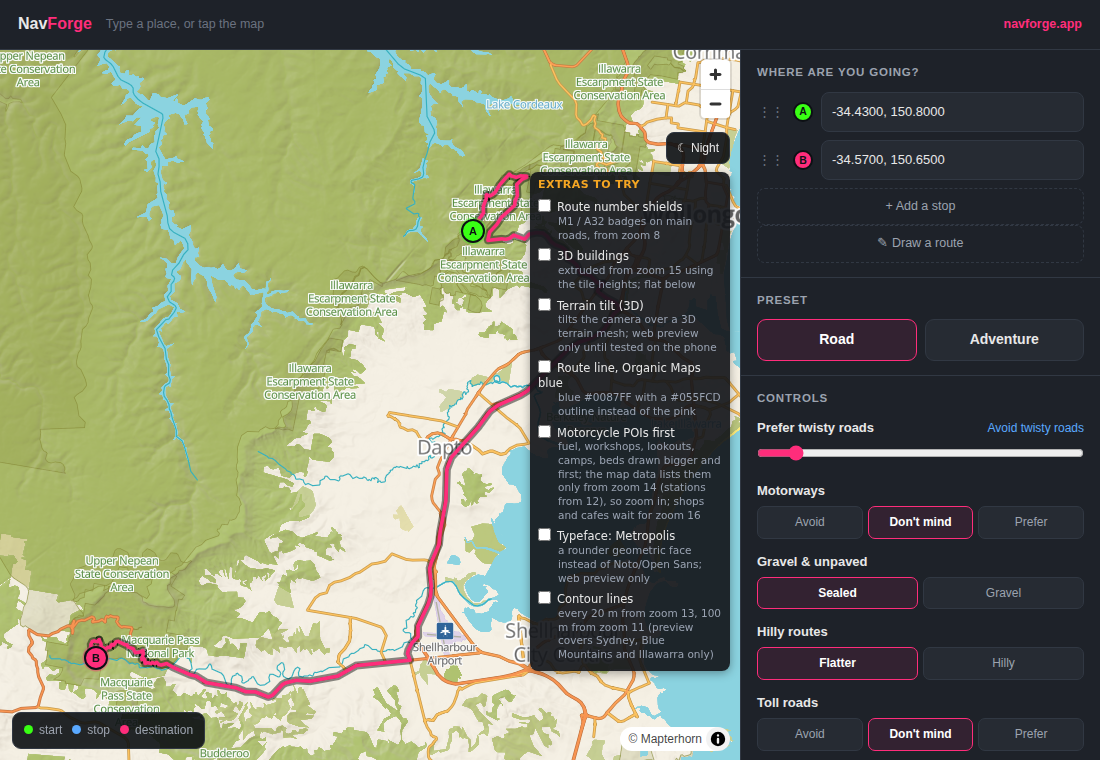
The map takes the left of the page, the plan the right. A and B are your two ends; the presets and the controls underneath are the same ones the app has.
On a phone the panel sits under the map instead of beside it.
Setting the two ends
-
Type a place, or tap the map
The search box at the top takes a town, a road or an address. Tapping the map drops the next pin instead. The first pin is A, your start; the second is B, your destination.
-
Add stops if you want them
+ Add a stop puts another row between the two ends. Drag the handle on the left of a row to reorder, tap × to remove one. Each leg between two stops can have its own preset — pick the leg under Which part of the ride? and set it.
-
Read the route
The route is worked out as soon as both ends exist and redrawn every time you change something. Distance and time sit above the turn list, and Turn by turn lists every turn so you can check it before you export.
Drop a pin in a paddock or a national park and a dashed line joins it to where the road route really starts or ends, with a sentence above the turn list — B is 21.5 km from the nearest road — the route ends there. The distance and time are the road part only.
Drawing a route instead
✎ Draw a route turns the map into a drawing pad. Drag along the roads you want — with the mouse, or a finger on a phone — and lift; the corners of your line become stops and the route is planned between them. Keep drawing to add more, drag a point to move it, and press ✓ Done drawing when the line is where you want it. Two fingers still zoom the map while you draw.
It doesn’t need to be neat. A rough line down the coast becomes a handful of stops and a real road route between them, which you can then tidy by dragging a stop or deleting one.
Presets and controls
Road and Adventure are the same two presets as the app: Road stays on sealed roads and doesn’t mind motorways; Adventure prefers twisty roads, allows gravel and hills, and avoids tolls. Underneath, the controls let you change one thing at a time:
- Prefer twisty roads — a slider, read out in words from Avoid twisty roads through No twisty preference to Maximum twisty roads.
- Motorways — Avoid, Don’t mind or Prefer.
- Gravel & unpaved — Sealed or Gravel.
- Hilly routes — Flatter or Hilly.
- Toll roads — Avoid, Don’t mind or Prefer.
- Ferry crossings — Avoid or Allow.
- Main roads — Avoid or Don’t mind.
These are the same words the app uses, on purpose: a plan you make here and a plan you make on the phone ask the routing engine for the same thing.
Taking the plan with you
- Export GPX — downloads the route as a GPX file. Open it in NavForge with Import GPX under My Rides, or share the file to NavForge from your phone’s Files app, and it lands in your rides ready to navigate. See My Rides.
- Copy share link — puts a link on your clipboard that carries the whole plan, stops, presets and controls included. Open it on any device and the same plan comes back.
- Start over — clears everything.
The map itself
The planner shows the same map data the app downloads, for the regions that exist so far — see Downloading maps for the list. Outside those regions you get a plain world map and a notice reading No detailed map here yet. Hills are shaded across the whole map. ☾ Night in the top-right of the map swaps to the dark look and back.
The checklist on the map holds optional looks — route number badges, 3D buildings, a tilted 3D view, contour lines and a few more. Each one describes itself in a line underneath. They are previews: switch one on and the map redraws with it, switch it off and it’s gone. They live on the website only for now.