The map screen
This is where you spend the whole ride. There are no tabs and no home screen — the map is the app. Everything else is a button on top of it or an item in the menu. Here’s what all of it does.
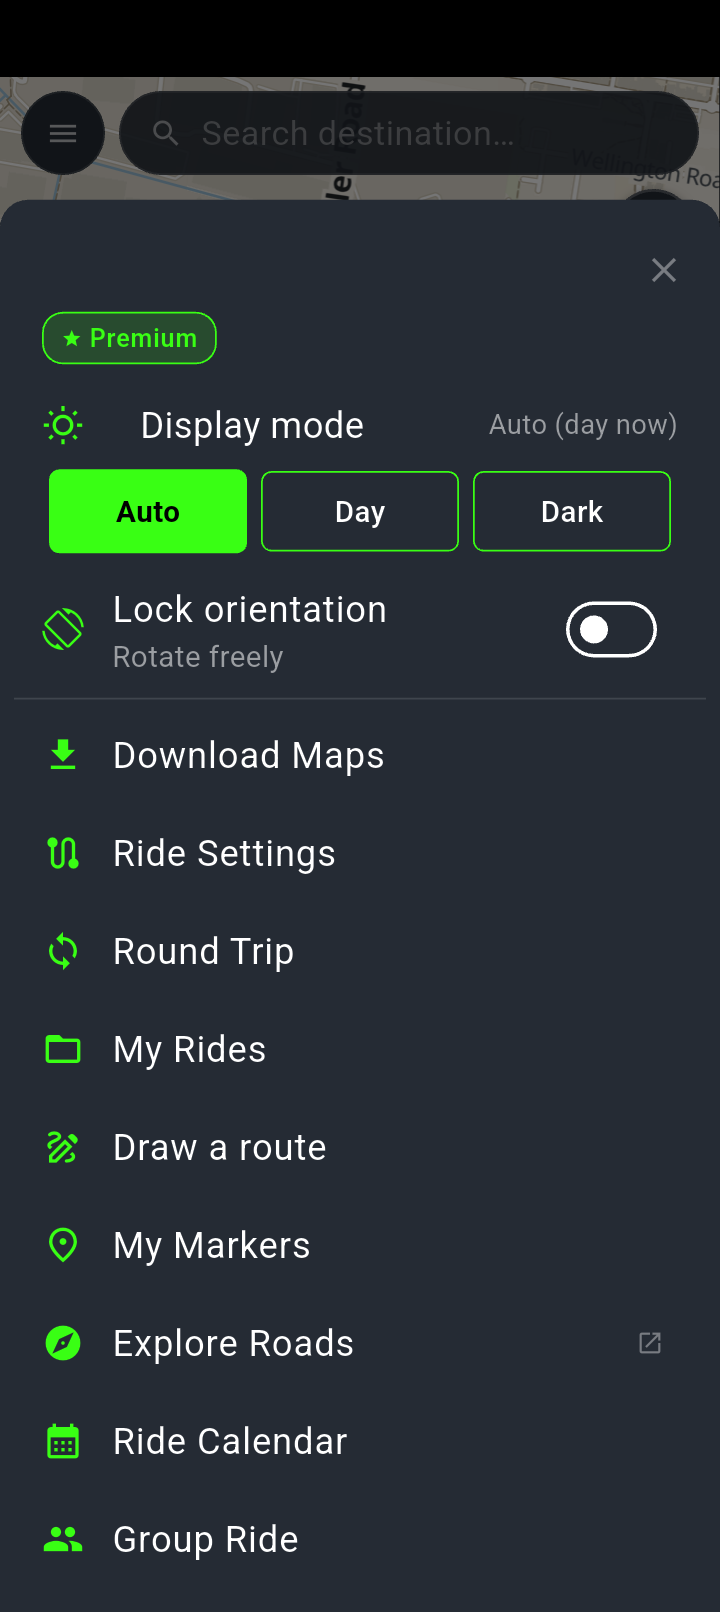
The menu is where everything that is not on the map lives. It slides up over the map rather than in from the edge.
Note what is missing here: there is no Turn-by-turn row and no Elevation Profile row, because no route was loaded when this was taken. Both appear as soon as one is.
Across the top
The menu button sits in the top-left corner. Tap it for everything that isn’t on the map.
The search bar takes up the rest of the width and reads Search destination… until you use it. In landscape it’s narrower, to leave the map room. During navigation it’s hidden — you’re already going somewhere.
Down the right-hand side
Four round buttons, always in this order. None of them has a text label, so it’s worth knowing them by position. Each one lights up in its own colour when it’s on, and shows a spinner in that colour while it loads.
-
Record — red dot
Starts recording your ride. While recording, the button grows taller, turns red and shows the elapsed time under the icon. If NavForge decides you’ve stopped for a break, the border turns orange and it says Paused.
-
Points of interest — pin
Shows fuel, food, hotels, camping and attractions as coloured badges. Tap a badge for its details. One tap gets you the points, which is what it’s on the rail for. Tap it while you’re navigating and it narrows to fuel only — the list you actually want mid-ride.
-
Map layers — stacked sheets
Opens a panel with the four things NavForge can draw over the map. It’s a sheet rather than four more buttons, so the rail stays usable in landscape.
-
Recentre — green crosshair
Brings the map back to you after you’ve dragged it somewhere else.
The four overlays each had their own button on the rail, which ran it edge to edge in landscape. They now live together behind Map layers. Nothing was removed — every layer still does exactly what it did, and has a different way in.
The Map layers sheet
Tap the third button and a panel slides up titled Map layers, with four rows. Each has a switch on the right, and each explains itself in a line underneath:
- Ride heatmap — Every ride you have recorded or imported. Lays your own history over the map so you can see where you’ve already been.
- Twisty roads — Roads coloured by how bendy they are. This is the one for planning a Sunday rather than a commute.
- Dirt roads — Dirt and gravel in terracotta, tracks dashed. A banner appears across the top of the map while it’s on, reminding you which colour means what.
- Restricted roads — Gates and roads you may not ride, from the map data. Worth a look before you commit to a track that turns out to be someone’s driveway.
Hills are not a layer you switch on: once a region’s hill-shading file is on the phone, the map draws the relief in every mode. Regions downloaded recently include it; older ones offer it under Download Maps.
Turn one on and it stays on for the session, but it comes back off when you next open the app. Same for the POI button. Nothing here is written to the phone, so a layer you rely on is one you’ll be switching on each ride.
Set a leg to Adventure and the map turns the Dirt roads layer on, so you can see the unsealed roads the router is about to consider. Turn it back off in the sheet if you’d rather not look at it.
The four readouts along the bottom
A dark floating pill, dark in day and night mode alike. Left to right:
Speed
The big number on the left is your speed. Beside it, smaller and greyer, is the speed limit for the road you’re on. Under both is the unit, and next to that a small italic note telling you where the limit came from:
- · sign — there’s a signposted limit recorded for that road.
- · legal default — no sign is recorded, so this is the legal default for that kind of road in that country. Treat it as an educated guess, not a sign you missed.
- · route — taken from the route data while navigating.
Your speed turns red when you’re well over the limit and stays red for a few seconds after you drop back, so a glance down can’t miss it. Below about 3 km/h the number is replaced with a dash, and it clears the same way if there’s been no GPS fix for five seconds.
Elevation
Your height above sea level. While you’re following a route with elevation data, this tracks the route’s profile at your position; otherwise it’s straight from GPS.
Switching the app to miles changes your speed and distances but not this number. It stays in metres.
Direction
One of the eight compass points — N, NE, E and so on. Standing still it comes from the phone’s compass. Once you’re moving it switches to your actual direction of travel, which is steadier and doesn’t care how the phone is mounted.
Lean
How far over you are, as a number in degrees, with no plus or minus — left and right read the same. It’s green normally, amber past your first threshold and red past the second, and it blinks in the red zone. Both thresholds are yours to set in Ride Settings.
The menu
Tapping the menu button slides up a panel. From the top:
- Display mode — three chips, Auto, Day and Dark. Auto follows sunrise and sunset where you are, and the line beside the heading tells you which one Auto has picked right now.
- Lock orientation — a switch. Turn it on and two more chips appear, Portrait and Landscape, so you can pin the screen the way your mount holds the phone. Off, it reads Rotate freely.
- Elevation Profile — only appears when there’s a route with height data to show.
- Download Maps — with a small number on it when one of your regions has an update waiting.
- Ride Settings — lean thresholds, when turns are announced, voice and intercom.
- Round Trip — generate a loop that brings you home.
- My Rides — everything you’ve recorded or imported.
- Draw a route — draw a ride on the map with your finger and the app snaps it to the roads. Covered under My Rides.
- My Markers — spots you’ve saved.
- Explore Roads — opens our website in your browser, so it needs a connection.
- Ride Calendar — trips you’ve planned against a date.
- Group Ride — ride with other people’s positions on your map.
- Report a problem — tell us when something’s wrong.
- Settings — units and the rest.
Items your plan doesn’t include show a small gold padlock and their name in grey.
Before your first map is in
With no region installed there’s nothing to draw, so instead of a map you get a green outline icon, No map downloaded and Open the menu to download a region. On top of that, a rounded banner floats over the map reading No map downloaded · Tap to get started — tapping it goes straight to the region list. Both disappear the moment your first region finishes installing.
On the very first launch a welcome sheet comes up over the top of all this, with a green Download Maps button and a Maybe later underneath.
While you’re navigating
The screen changes shape once a route is running:
- The search bar goes away.
- A strip along the very bottom shows distance remaining and your arrival time.
- A pink Stop pill appears near the bottom. That’s how you end navigation — there’s no menu item for it.
- The POI layer, if you had it on, narrows itself to fuel only within about five kilometres of you. All the categories come back when navigation ends.
- After about ten seconds without a tap, the menu button and the four right-hand buttons fade out. Tap anywhere and they come back for another ten.
A chip appears at the bottom-left above the readouts showing how many riders are with you — or Waiting… until somebody joins. Tap it to open the group ride screen.
Moving the map
Drag to pan, pinch to zoom, twist with two fingers to rotate, and drag two fingers up or down to tilt. There’s no compass button to reset the rotation — the recentre button at the bottom of the right-hand column is what brings you back to yourself.
Press and hold anywhere on the map to drop a point. NavForge names the spot for you where it can, and offers the same options as a search result.